Vagrant+Virtual Box 快速搭建开发环境
Vagrant.configure("2") do |config|config.vm.box = "ubuntu/xenial64"# config.vm.network "forwarded_port", guest: 80, host: 80# config.vm.network "forwarded_port", guest: 3306, host: 3306config.vm.network "private_network", ip: "10.0.0.3"config.vm.provision "shell", inline: <<-SHELL# 更换aliyun软件源cp /etc/apt/sources.list /etc/apt/sources.list.bakecho 'deb http://mirrors.aliyun.com/ubuntu/ xenial main restricted universe multiverse' > /etc/apt/sources.listecho 'deb http://mirrors.aliyun.com/ubuntu/ xenial-security main restricted universe multiverse' >> /etc/apt/sources.listecho 'deb http://mirrors.aliyun.com/ubuntu/ xenial-updates main restricted universe multiverse' >> /etc/apt/sources.listecho 'deb http://mirrors.aliyun.com/ubuntu/ xenial-proposed main restricted universe multiverse' >> /etc/apt/sources.listecho 'deb http://mirrors.aliyun.com/ubuntu/ xenial-backports main restricted universe multiverse' >> /etc/apt/sources.listapt-get update# 安装dockerapt-get -y install apt-transport-https ca-certificates curl software-properties-commoncurl -fsSL http://mirrors.aliyun.com/docker-ce/linux/ubuntu/gpg | sudo apt-key add -add-apt-repository "deb [arch=amd64] http://mirrors.aliyun.com/docker-ce/linux/ubuntu $(lsb_release -cs) stable"apt-get -y updateapt-get -y install docker-ce docker-compose# 使用aliyun加速docker镜像mkdir -p /etc/dockerecho '{' > /etc/docker/daemon.jsonecho ' "registry-mirrors": ["https://kag9wqej.mirror.aliyuncs.com"]' >> /etc/docker/daemon.jsonecho '}' >> /etc/docker/daemon.jsonsystemctl daemon-reloadsystemctl restart docker# 把vagrant用户添加到 docker 组usermod -G docker vagrant# ssh登录后, 进入/vagrant目录, 并启动docker compose , 然后 输出一下当前正在运行的容器echo 'cd /vagrant && docker-compose up -d && docker ps' >> /home/vagrant/.bashrcSHELLend
vagrant+docker一键搭建php+mysql开发环境
必备软件
- Vagrant
- Virtual Box
启动脚本
- Vagrantfile
Vagrant.configure("2") do |config|config.vm.box = "ubuntu/xenial64"config.vm.network "forwarded_port", guest: 80, host: 80config.vm.network "forwarded_port", guest: 3306, host: 3306config.vm.network "private_network", ip: "10.0.0.2"config.vm.provision "shell", inline: <<-SHELL# 更换aliyun软件源cp /etc/apt/sources.list /etc/apt/sources.list.bakecho 'deb http://mirrors.aliyun.com/ubuntu/ xenial main restricted universe multiverse' > /etc/apt/sources.listecho 'deb http://mirrors.aliyun.com/ubuntu/ xenial-security main restricted universe multiverse' >> /etc/apt/sources.listecho 'deb http://mirrors.aliyun.com/ubuntu/ xenial-updates main restricted universe multiverse' >> /etc/apt/sources.listecho 'deb http://mirrors.aliyun.com/ubuntu/ xenial-proposed main restricted universe multiverse' >> /etc/apt/sources.listecho 'deb http://mirrors.aliyun.com/ubuntu/ xenial-backports main restricted universe multiverse' >> /etc/apt/sources.listapt-get update# 安装dockerapt-get -y install apt-transport-https ca-certificates curl software-properties-commoncurl -fsSL http://mirrors.aliyun.com/docker-ce/linux/ubuntu/gpg | sudo apt-key add -add-apt-repository "deb [arch=amd64] http://mirrors.aliyun.com/docker-ce/linux/ubuntu $(lsb_release -cs) stable"apt-get -y updateapt-get -y install docker-ce docker-compose# 使用aliyun加速docker镜像mkdir -p /etc/dockerecho '{' > /etc/docker/daemon.jsonecho ' "registry-mirrors": ["https://kag9wqej.mirror.aliyuncs.com"]' >> /etc/docker/daemon.jsonecho '}' >> /etc/docker/daemon.jsonsystemctl daemon-reloadsystemctl restart dockerusermod -G docker vagrantcd /vagrantdocker-compose up -d# 开机自启动echo '#!/bin/bash' > /etc/rc.localecho 'sleep 10' >> /etc/rc.localecho 'cd /vagrant' >> /etc/rc.localecho 'docker-compose up -d' >> /etc/rc.localecho 'exit 0' >> /etc/rc.localsudo rm /bin/shsudo ln -s /bin/bash /bin/shSHELLend
- docker-compose.yml
version: '2'services:mysql:image: mysqlenvironment:- MYSQL_ROOT_PASSWORD=rootvolumes:- "./mysql:/var/lib/mysql"ports:- '3306:3306'networks:- bridgewww:build: .volumes:- "./wwwroot/www:/app"- "./wwwroot/static/Uploads:/app/Uploads"environment:- VIRTUAL_HOST="你要绑定的域名"- PHP_DB_HOST=mysql- PHP_DB_NAME=你的数据库名称- PHP_DB_USER=root- PHP_DB_PASSWORD=rootnetworks:- bridgelb:image: 'dockercloud/haproxy'volumes:- /var/run/docker.sock:/var/run/docker.socklinks:- wwwports:- '80:80'networks:- bridgenetworks:bridge:
- Dockerfile
FROM php:5.6-apache# 安装扩展COPY ./soft/*.tgz /soft/WORKDIR /softRUN pecl install redis-3.1.6.tgz \&& pecl install xdebug-2.5.5.tgz \&& docker-php-ext-enable redis xdebug \&& docker-php-ext-install pdo_mysql \&& docker-php-ext-install mysqli \&& rm -rf /soft# URL重写RUN a2enmod rewrite# 安装composerADD ./soft/composer.phar /usr/local/bin/composerRUN chmod 755 /usr/local/bin/composer \&& composer config -g repo.packagist composer https://packagist.phpcomposer.com# 安装代码COPY ./wwwroot /app/# 修改网站主目录ENV APACHE_DOCUMENT_ROOT /appRUN sed -ri -e 's!/var/www/html!${APACHE_DOCUMENT_ROOT}!g' /etc/apache2/sites-available/*.confRUN sed -ri -e 's!/var/www/!${APACHE_DOCUMENT_ROOT}!g' /etc/apache2/apache2.conf /etc/apache2/conf-available/*.conf# 可写权限RUN chmod -R 777 /app/# 默认工作目录WORKDIR /app# 暴露工作端口EXPOSE 80 443 22
如何严格限制session在30分钟后过期
- 设置客户端cookie的lifetime为30分钟;
- 设置session的最大存活周期也为30分钟;
- 为每个session值加入时间戳,然后在程序调用时进行判断;
至于为什么,我们首先来了解下php中session的基本原理:
PHP中的session有效期默认是1440秒(24分钟),也就是说,客户端超过24分钟没有刷新,当前session就会失效。当然如果用户关闭了浏览器,会话也就结束了,Session自然也不存在了!
大家知道,Session储存在服务器端,根据客户端提供的SessionID来得到这个用户的文件,然后读取文件,取得变量的值,SessionID可以使用客户端的Cookie或者Http1.1协议的Query_String(就是访问的URL的“?”后面的部分)来传送给服务器,然后服务器读取Session的目录……
要控制Session的生命周期,首先我们需要了解一下php.ini关于Session的相关设置(打开php.ini文件,在“[Session]”部分):
- session.use_cookies:默认的值是“1”,代表SessionID使用Cookie来传递,反之就是使用Query_String来传递;
- session.name:这个就是SessionID储存的变量名称,可能是Cookie,也可能是Query_String来传递,默认值是“PHPSESSID”;
- session.cookie_lifetime:这个代表SessionID在客户端Cookie储存的时间,默认是0,代表浏览器一关闭SessionID就作废……就是因为这个所以Session不能永久使用!
- session.gc_maxlifetime:这个是Session数据在服务器端储存的时间,如果超过这个时间,那么Session数据就自动删除!
还有很多的设置,不过和本文相关的就是这些了,下面开始讲如何设置Session的存活周期。
前面说过,服务器通过SessionID来读取Session的数据,但是一般浏览器传送的SessionID在浏览器关闭后就没有了,那么我们只需要人为的设置SessionID并且保存下来,不就可以……
如果你拥有服务器的操作权限,那么设置这个非常非常的简单,只是需要进行如下的步骤:
- 把“session.use_cookies”设置为1,使用Cookie来储存SessionID,不过默认就是1,一般不用修改;
- 把“session.cookie_lifetime”改为你需要设置的时间(比如一个小时,就可以设置为3600,以秒为单位);
- 把“session.gc_maxlifetime”设置为和“session.cookie_lifetime”一样的时间;
在PHP的文档中明确指出,设定session有效期的参数是session.gc_maxlifetime。可以在php.ini文件中,或者通过ini_set()函数来修改这一参数。问题在于,经过多次测试,修改这个参数基本不起作用,session有效期仍然保持24分钟的默认值。
由于PHP的工作机制,它并没有一个daemon线程,来定时地扫描session信息并判断其是否失效。当一个有效请求发生时,PHP会根据全局变量session.gc_probability/session.gc_divisor(同样可以通过php.ini或者ini_set()函数来修改)的值,来决定是否启动一个GC(Garbage Collector)。
默认情况下,session.gc_probability = 1,session.gc_divisor =100,也就是说有1%的可能性会启动GC。GC的工作,就是扫描所有的session信息,用当前时间减去session的最后修改时间(modified date),同session.gc_maxlifetime参数进行比较,如果生存时间已经超过gc_maxlifetime,就把该session删除。
到此为止,工作一切正常。那为什么会发生gc_maxlifetime无效的情况呢?
在默认情况下,session信息会以文本文件的形式,被保存在系统的临时文件目录中。在Linux下,这一路径通常为\tmp,在 Windows下通常为C:\Windows\Temp。当服务器上有多个PHP应用时,它们会把自己的session文件都保存在同一个目录中。同样地,这些PHP应用也会按一定机率启动GC,扫描所有的session文件。
问题在于,GC在工作时,并不会区分不同站点的session。举例言之,站点A的gc_maxlifetime设置为2小时,站点B的 gc_maxlifetime设置为默认的24分钟。当站点B的GC启动时,它会扫描公用的临时文件目录,把所有超过24分钟的session文件全部删除掉,而不管它们来自于站点A或B。这样,站点A的gc_maxlifetime设置就形同虚设了。
找到问题所在,解决起来就很简单了。修改session.save_path参数,或者使用session_save_path()函数,把保存session的目录指向一个专用的目录,gc_maxlifetime参数工作正常了。
还有一个问题就是,gc_maxlifetime只能保证session生存的最短时间,并不能够保存在超过这一时间之后session信息立即会得到删除。因为GC是按机率启动的,可能在某一个长时间内都没有被启动,那么大量的session在超过gc_maxlifetime以后仍然会有效。
Atom设置eclipse快捷键
Settings - Keybindings - 点击”your keymap file”
'atom-text-editor':'alt-/': 'autocomplete-plus:activate''atom-text-editor:not([mini])':'ctrl-d': 'editor:delete-line''atom-workspace atom-text-editor:not([mini])':'alt-up': 'editor:move-line-up''alt-down': 'editor:move-line-down''.platform-win32':'ctrl-shift-R': 'fuzzy-finder:toggle-file-finder''ctrl-shift-T': 'fuzzy-finder:toggle-file-finder''.platform-win32, .platform-win32 .command-palette atom-text-editor':'ctrl-p': 'command-palette:toggle''.platform-darwin, .platform-win32, .platform-linux':'ctrl-l': 'go-to-line:toggle'
linux自动压缩apache日志的计划任务脚本
上线后的网站, apache的日志每天都会增长很多, 有时一天就是几个G, 要么关闭日志, 要么压缩保存, 这里提供一个定时压缩的脚本, 每天
步骤
- 创建备份压缩脚本
- 创建计划任务
1. 创建备份压缩脚本
在服务器上创建一个shell脚本文件, 写入以下内容
now_date=`date -d yesterday +%Y_%m_%d`/usr/bin/gzip -c 日志文件路径/access.log > 压缩后的路径/access.log_${now_date}.gzecho "" > 日志文件路径/access.log/usr/bin/gzip -c 错误日志文件路径/error.log > 错误日志文件路径/error.log_${now_date}.gzecho "" > 错误日志文件路径/error.log
实例: /data/wwwlog/gzip_log.cron
now_date=`date -d yesterday +%Y_%m_%d`/usr/bin/gzip -c /data/wwwlog/access.log > /data/wwwlog/access.log_${now_date}.gzecho "" > /data/wwwlog/access.log/usr/bin/gzip -c /data/wwwlog/error.log > /data/wwwlog/error.log_${now_date}.gzecho "" > /data/wwwlog/error.log
2. 创建计划任务
- 在命令行输入
crontab -e调出计划任务配置文件 - 写入配置
10 0 * * * sh /data/wwwlog/gzip_log.cron esc:wq回车保存
这样就可以在每天晚上 12点压缩日志了
Windows上读取Linux分区文件
昨天做了个Ubuntu15.10的 U盘系统, 把整个Ubuntu系统安装到了U盘里, 感觉效果也不错, 界面开发都很赞, 但是关机启动Windows后发现U盘识别不了了, 在网上搜索后发现 ext2fsd (http://www.ext2fsd.com/) 这个软件, 感觉不错给大家分享一下.
首先下载这个软件, 下载地址: http://www.ext2fsd.com/
安装软件, 一路 下一步 下一步… 完成
运行软件
然后U盘就可以访问了.
Arduino
简介
Arduino是一款便捷灵活、方便上手的开源电子原型平台,包含硬件(各种型号的Arduino板)和软件(Arduino IDE)。由一个欧洲开发团队于2005年冬季开发。其成员包括Massimo Banzi、David Cuartielles、Tom Igoe、Gianluca Martino、David Mellis和Nicholas Zambetti。
它构建于开放原始码simple I/O介面版,并且具有使用类似Java、C语言的Processing/Wiring开发环境。主要包含两个主要的部分:硬件部分是可以用来做电路连接的Arduino电路板;另外一个则是Arduino IDE,你的计算机中的程序开发环境。你只要在IDE中编写程序代码,将程序上传到Arduino电路板后,程序便会告诉Arduino电路板要做些什么了。
Arduino能通过各种各样的传感器来感知环境,通过控制灯光、马达和其他的装置来反馈、影响环境。板子上的微控制器可以通过Arduino的编程语言来编写程序,编译成二进制文件,烧录进微控制器。对Arduino的编程是利用 Arduino编程语言 (基于 Wiring)和Arduino开发环境(基于 Processing)来实现的。基于Arduino的项目,可以只包含Arduino,也可以包含Arduino和其他一些在PC上运行的软件,他们之间进行通信 (比如 Flash, Processing, MaxMSP)来实现。
发展历程
Massimo Banzi之前是意大利Ivrea一家高科技设计学校的老师。他的学生们经常抱怨找不到便宜好用的微控制器。 2005年冬天, Massimo Banzi跟David Cuartielles讨论了这个问题。 David Cuartielles是一个西班牙籍晶片工程师,当时在这所学校做访问学者。两人决定设计自己的电路板,并引入了Banzi的学生David Mellis为电路板设计编程语言。两天以后,David Mellis就写出了程式码。又过了三天,电路板就完工了。Massimo Banzi喜欢去一家名叫di Re Arduino的酒吧,该酒吧是以1000年前意大利国王Arduin的名字命名的。为了纪念这个地方,他将这块电路板命名为Arduino。
随后Banzi、Cuartielles和Mellis把设计图放到了网上。版权法可以监管开源软件,却很难用在硬件上,为了保持设计的开放源码理念,他们决定采用Creative Commons(CC)的授权方式公开硬件设计图。在这样的授权下.任何人都可以生产电路板的复制品,甚至还能重新设计和销售原设计的复制品。人们不需要支付任何费用,甚至不用取得Arduino团队的许可。然而,如果重新发布了引用设计,就必须声明原始Arduino团队的贡献。如果修改了电路板,则最新设计必须使用相同或类似的Creative Commons(CC)的授权方式,以保证新版本的Arduino电路板也会一样是自由和开放的。唯一被保留的只有Arduino这个名字,它被注册成了商标,在没有官方授权的情况下不能使用它。
Arduino发展至今,已经有了多种型号及众多衍生控制器推出。[2]
平台特点
跨平台
Arduino IDE可以在Windows、Macintosh OSX、Linux三大主流操作系统上运行,而其他的大多数控制器只能在Windows上开发。
简单清晰
Arduino IDE基于processing IDE开发。对于初学者来说,极易掌握,同时有着足够的灵活性。Arduino语言基于wiring语言开发,是对 AVRGCC库的二次封装,不需要太多的单片机基础、编程基础,简单学习后,你也可以快速的进行开发。
开放性
Arduino的硬件原理图、电路图、IDE软件及核心库文件都是开源的,在开源协议范围内里可以任意修改原始设计及相应代码。
发展迅速
Arduino不仅仅是全球最流行的开源硬件,也是一个优秀的硬件开发平台,更是硬件开发的趋势。Arduino简单的开发方式使得开发者更关注创意与实现,更快的完成自己的项目开发,大大节约了学习的成本,缩短了开发的周期。
因为Arduino的种种优势,越来越多的专业硬件开发者已经或开始使用Arduino来开发他们的项目、产品;越来越多的软件开发者使用Arduino进入硬件、物联网等开发领域;大学里,自动化、软件,甚至艺术专业,也纷纷开展了Arduino相关课程。[3]
功能
可以快速使用Arduino与Adobe Flash, Processing, Max/MSP, Pure Data, SuperCollider等软件结合,作出互动作品。 Arduino可以使用现有的电子元件例如开关或者传感器或者其他控制器件、LED、步进马达或其他输出装置。 Arduino也可以独立运行,并与软件进行交互,例如: Macromedia Flash, Processing, Max/MSP, Pure Data, VVVV或其他互动软件…。 Arduino的IDE界面基于开放源代码,可以免费下载使用,开发出更多令人惊艳的互动作品。
硬件组成
主板
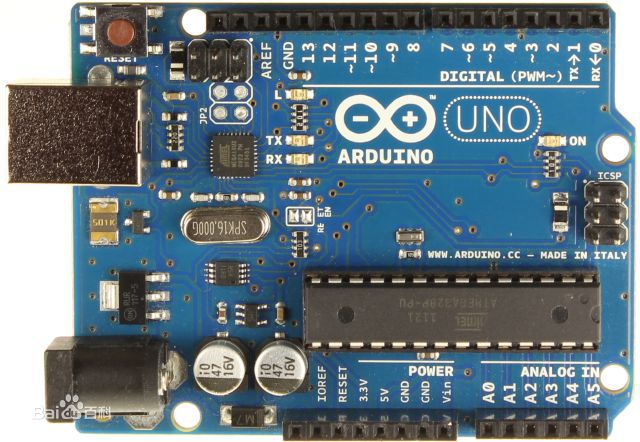
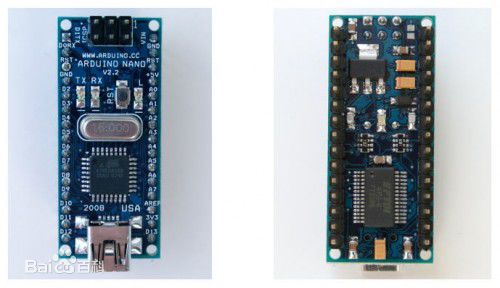
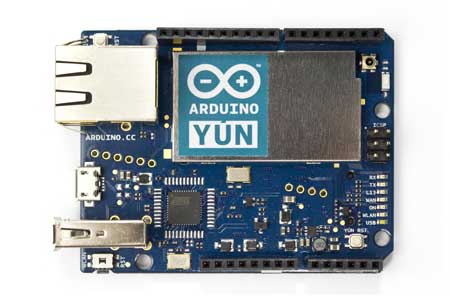
Arduino的型号有很多,如
- Arduino Uno
- Arduino Nano
- Arduino LilyPad
- Arduino Mega 2560
- Arduino Ethernet
- Arduino Due
- Arduino Leonardo
- Arduino Yún

Arduino Uno

Arduino Nano

Arduino Yun
扩展板
Arduino的扩展板很多,如
- Ard- uino GSM Shield
- Arduino GSM Shield Front
- Arduino Ethernet Shield
- Arduino WiFiShield
- Arduino Wireless SD Shield
- Arduino USB Host Shield
- Arduino Motor Shield
- Arduino Wireless Proto Shield
- Arduino Proto Shield
版权与付费
为了保持设计的开放源码理念,因为版权法可以监管开源软件,却很难用在硬件上,Arduino决定采用Creative Commons许可。 Creative Commons(CC)是为保护开放版权行为而出现的类似GPL的一种许可(license)。在Creative Commons许可下,任何人都被允许生产电路板的复制品,还能重新设计,甚至销售原设计的复制品。你不需要付版税,甚至不用取得Arduino团队的许可。然而,如果你重新发布了引用设计,你必须说明原始Arduino团队的贡献。如果你调整或改动了电路板,你的最新设计必须使用相同或类似的 Creative Commons许可,以保证新版本的Arduino电路板也会一样的自由和开放。唯一被保留的只有Arduino这个名字。它被注册成了商标。如果有人想用这个名字卖电路板,那他们可能必须付一点商标费用给Arduino的核心开发团队成员。
Virtual Box 和 Ubuntu Server 14.10 的共享文件
1. 安装gcc和make
sudo apt-get install gccsudo apt-get install make
2. 安装增强工具
- 用xftp上传vbox安装目录中的VBoxGuestAdditions.iso
- 挂在VBoxGuestAdditions.iso
- 安装
sudo mkdir /media/cdimagesudo mount -o loop VBoxGuestAdditions.iso /media/cdimagecd /media/cdimagesudo ./VBoxLinuxAdditions.run
3. 关机
4. 添加共享目录
5. 映射共享目录
sudo mkdir /datasudo mount -t vboxsf share /data