内网互通

工作中经常需要访问公司内网的一些资源, 这时候就需要搭建一个专用网络.

  1. # 1. 创建 docker-compose.yml
  2. version: '2'
  3. services:
  4. openvpn:
  5. image: kylemanna/openvpn
  6. container_name: openvpn
  7. ports:
  8. - "1194:1194/udp"
  9. restart: always
  10. volumes:
  11. - ./openvpn-data:/etc/openvpn
  12. cap_add:
  13. - NET_ADMIN
  14. # 2. 配置
  15. docker-compose run --rm openvpn ovpn_genconfig -u udp://82.157.11.224
  16. docker-compose run --rm openvpn ovpn_initpki
  17. docker-compose up -d openvpn
  18. # 3. 添加用户和导出客户端配置
  19. docker-compose run --rm openvpn easyrsa build-client-full shuai nopass
  20. docker-compose run --rm openvpn ovpn_getclient shuai > ./shuai.ovpn
  21. # 4. 删除用户
  22. docker-compose run --rm openvpn easyrsa revoke shuai
  23. docker-compose run --rm openvpn easyrsa gen-crl update-db
  24. # 重启
  25. docker-compose restart openvpn

百度联盟广告对接

  1. $(function () {
  2. var app = {
  3. config: {
  4. list: [
  5. {
  6. url: /www\.xxx\.com\/$/,
  7. desc: '首页导航下面广告位',
  8. dom: '#nav',
  9. area: 'after',
  10. newDom: '<div class="w1200" style=" text-align: center; margin: 10px auto;"></div>',
  11. script: '//aa.xxx.com/production/f_azcs/source/gp_p/z.js',
  12. }
  13. ]
  14. },
  15. run: function () {
  16. var list = this.config.list
  17. for (var i in list) {
  18. var page = list[i];
  19. if (page.url.test(location.href)) {
  20. if (page.items) {
  21. for (var j in page.items) {
  22. var item = page.items[j];
  23. this.doItem(item);
  24. }
  25. } else {
  26. this.doItem(page);
  27. }
  28. }
  29. }
  30. },
  31. doItem: function (item) {
  32. var next = (item.onBefore ? item.onBefore() : true);
  33. next = next && (item.isShow ? item.isShow() : true);
  34. if (next) {
  35. var newDom = $(item.newDom);
  36. if($(item.dom).length) {
  37. $(item.dom)[item.area](newDom);
  38. newDom[0].appendChild(this.createScript(item.script));
  39. }
  40. }
  41. },
  42. createScript: function (url) {
  43. var script = document.createElement('script');
  44. script.setAttribute('type', 'text/javascript');
  45. script.setAttribute('src', url);
  46. return script;
  47. }
  48. };
  49. app.run();
  50. });

git 自动保存密码

在命令行中执行下面的命令, 之后就可以自动保存帐号密码了

  1. cd /project
  2. git config --global credential.helper store
  3. git pull

ESP8266 联网后执行在线代码

espruino/esp8266 加载远程代码

今天玩esp8266的时候突然想到, 是不是可以直接运行线上代码, 这样的话就可以灵活的配置esp8266执行什么操作了, 也不用每次更新代码都要把设备拆下来搞到电脑上去下载程序, 因为本身esp8266就需要联网工作, 所以就想到了联网后获取在线代码进行执行, 如果代码更新只需要重启设备就可以了, 不用每次都插到电脑上去下载代码. 后来翻了一下espruino的文档发现有提供加载线上模块的方法, 于是就实现了一下, 下面是加载远程代码的逻辑.

烧录espruino固件并下载代码

  1. 配置wifi和线上代码地址 (注意需要使用http协议, 不支持https协议)
  2. 将代码写入esp8266
  3. 编写线上代码
  4. 重启设备
  5. 重启后设备就会自动联网和拉取指定的代码并执行了.
  1. var wifi = require('Wifi');
  2. var app = {
  3. config: {
  4. wifi: {
  5. ssid: '你的wifi名称',
  6. password: '你的wifi密码'
  7. },
  8. // 你的线上代码地址
  9. online: 'http://espjs.admin-ui.cn/ota.js'
  10. },
  11. init: function () {
  12. this.wifi();
  13. },
  14. wifi: function () {
  15. var self = this;
  16. console.log('wifi connecting...');
  17. wifi.connect(self.config.wifi.ssid, { password: self.config.wifi.password }, err => {
  18. if (err) {
  19. console.log('wifi connect error: ', err);
  20. return;
  21. }
  22. wifi.getIP(function (err, result) {
  23. self.onWifiConnected(result);
  24. });
  25. });
  26. },
  27. run: function () {
  28. this.init();
  29. },
  30. onWifiConnected: function (result) {
  31. console.log('wifi connected: ', result);
  32. this.loadModule(this.config.online);
  33. },
  34. loadModule: function (url, callback) {
  35. if (url.substr(0, 4) !== 'http') {
  36. url = 'http://www.espruino.com/modules/' + url + '.min.js';
  37. }
  38. require("http").get(url, function (res) {
  39. var contents = "";
  40. res.on('data', function (data) { contents += data; });
  41. res.on('close', function () {
  42. Modules.addCached(url, contents);
  43. if (callback) callback();
  44. });
  45. }).on('error', function (e) {
  46. console.log("ERROR", e);
  47. });
  48. }
  49. };
  50. app.run();

案例

比如我这里用了自己的域名, 线上代码是一个获取温湿度和显示的一个例子.
代码地址: http://espjs.admin-ui.cn/ota.js

  1. var demo = {
  2. config: {
  3. dht: {
  4. pin: NodeMCU.D1
  5. },
  6. oled: {
  7. scl: NodeMCU.D5,
  8. sda: NodeMCU.D4,
  9. width: 128,
  10. height : 64
  11. },
  12. led: {
  13. pin: NodeMCU.D2,
  14. }
  15. },
  16. device: {
  17. dht: null,
  18. oled: null,
  19. led: null
  20. },
  21. init: function () {
  22. this.led();
  23. this.oled();
  24. this.dht(2000);
  25. },
  26. led: function () {
  27. var self = this;
  28. app.loadModule('http://espjs.admin-ui.cn/libs/led.js', function (LED) {
  29. self.device.led = new LED(self.config.led.pin);
  30. self.device.led.close();
  31. });
  32. },
  33. dht: function (time) {
  34. var self = this;
  35. app.loadModule('DHT11', function (dht11) {
  36. self.device.dht = dht11.connect(self.config.dht.pin);
  37. setInterval(function () {
  38. self.device.dht.read(function (result) {
  39. self.onDht(result.temp, result.rh);
  40. });
  41. }, time);
  42. });
  43. },
  44. oled: function () {
  45. var self = this;
  46. var i2c = new I2C();
  47. i2c.setup({
  48. scl: this.config.oled.scl,
  49. sda: this.config.oled.sda,
  50. bitrate: 100000
  51. });
  52. var config = {
  53. width: this.config.oled.width,
  54. height: this.config.oled.height
  55. };
  56. app.loadModule('SH1106', function (ssd1306) {
  57. self.device.oled = ssd1306.connect(i2c, function () {
  58. self.onOledInit();
  59. }, config);
  60. })
  61. },
  62. run: function () {
  63. this.init();
  64. },
  65. onDht: function (temp, rh) {
  66. console.log('Temp is ' + temp + ' and RH is ' + rh);
  67. if (this.device.oled) {
  68. this.device.oled.clear(true);
  69. this.device.oled.drawString('Temp: ' + temp , 40 , 20);
  70. this.device.oled.drawString('RH: ' + rh, 40 , 40);
  71. this.device.oled.flip();
  72. }
  73. },
  74. onWifiConnected: function (result) {
  75. console.log('wifi connected: ', result);
  76. },
  77. onOledInit: function () {
  78. this.device.oled.clear(true);
  79. this.device.oled.drawString("Hello World!", 50 , 40);
  80. this.device.oled.flip();
  81. console.log('oled init finish');
  82. }
  83. };
  84. demo.run();

效果是这样的:

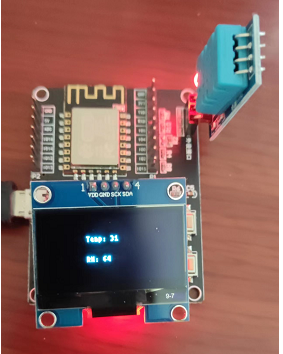
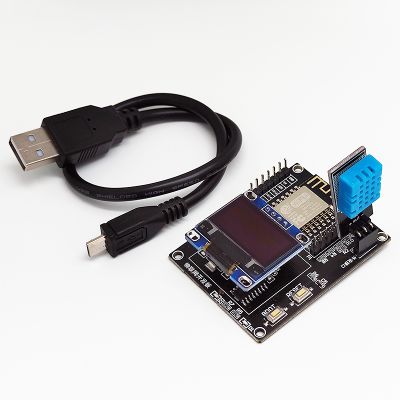
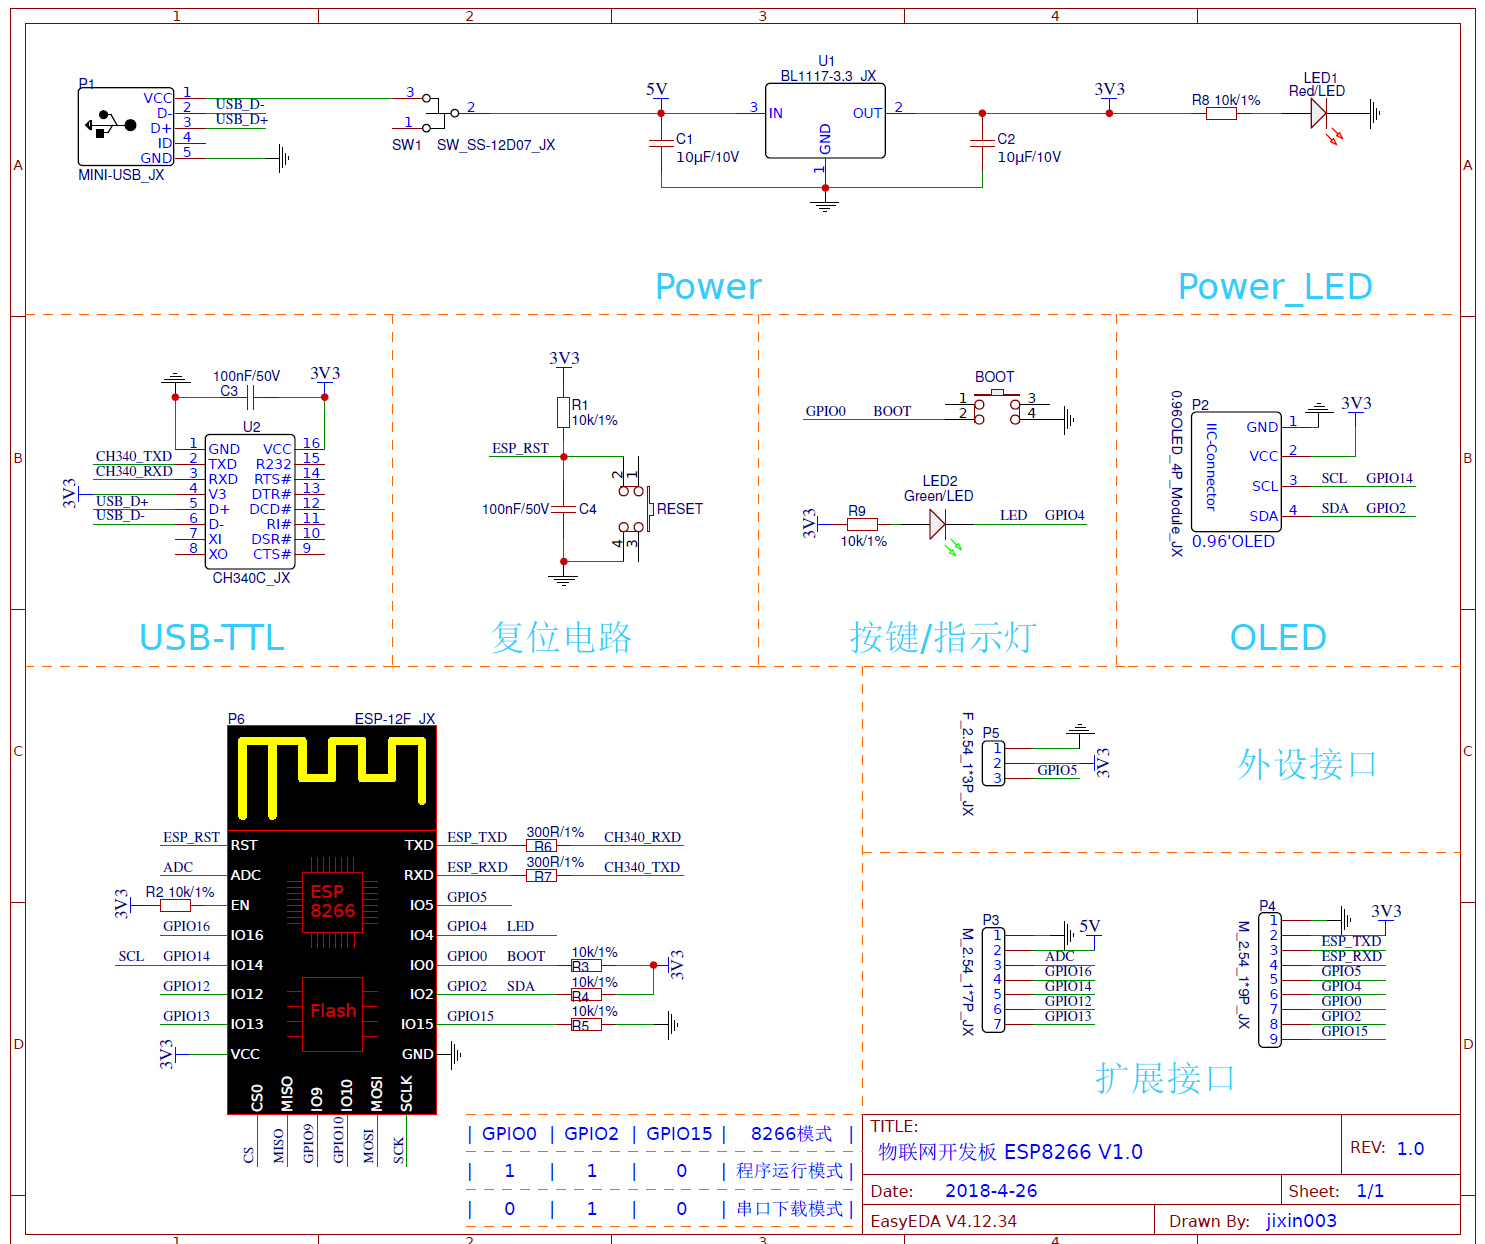
ESP8266 Dev Board 电路图

NodeMCU 引脚对应图


NodeMCU引脚对应图

js拦截页面跳转并获取目标地址

  1. navigation.onnavigate = function () {
  2. // 这里可以获取到最终跳转到的url
  3. var url = arguments[0].destination.url;
  4. console.log('url: ', url);
  5. return window.event.returnValue = false;
  6. }

windows 10 注册表修改

  1. win+r 输入 regedit
  2. 在导航中输入HKEY_LOCAL_MACHINE\SYSTEM\CurrentControlSet\Services\PolicyAgent
  3. 右键 > 新建: AssumeUDPEncapsulationContextOnSendRule 类型选择 DWORD (32 位)值(D)
  4. 然后双击 AssumeUDPEncapsulationContextOnSendRule数值数据(V) 中输入 2
  5. 重启

关于Chrome跨域The request client is not a secure context and the resource is in more-private address space loca相关提示的解决

最近想使用serve 配置一个本地的 chrome 脚本注入功能, 没想到浏览器提示:

Access to script at ‘http://localhost:85/index.js‘ from origin ‘http://www.xxx.com‘ has been blocked by CORS policy: The request client is not a secure context and the resource is in more-private address space local.

貌似是chrome有设置, 在地址栏中输入:
chrome://flags/#block-insecure-private-network-requests

然后选Disabled ,relaunch 后就能恢复正常了, 根据翻译:

block-insecure-private-network-requests
防止非安全上下文向更私密的IP地址发出子资源请求。如果1)IP1是本地主机,而IP2不是,或者2)IP1是私有的,而IP2是公共的,则IP地址IP1比IP2更私有。这是全面实施CORS-RFC1918的第一步:https://wicg.github.io/cors-rfc1918–Mac、Windows、Linux、Chrome OS、Android、Fuchsia
阻止不安全的专用网络请求

应该是处于安全考虑, 禁止向私有地址请求和发生数据

直播服务器搭建方法

直播服务器搭建流程

  1. 服务器上安装node-media-server
  2. 本地安装ffmpeg
  3. 测试推流
  4. 浏览器查看直播内容

1. 安装node-media-server

  1. ## 在服务器上启动node-media-server 服务
  2. docker run --name nms -d -p 1935:1935 -p 8000:8000 -p 8443:8443 illuspas/node-media-server

2. 本地安装 ffmpeg

  1. 下载解压对应版本的ffmpeg到本地: https://github.com/BtbN/FFmpeg-Builds/releases
  2. 添加环境变量

3. 测试推流

  1. ## 在本地找到视频文件目录, 执行推流命令
  2. ffmpeg -re -i hello.mp4 -c copy -f flv rtmp://localhost/live/hello

4. 浏览器查看直播

使用NodePlayer.js 播放直播内容: https://github.com/illuspas/NodePlayer.js

  1. <canvas id="video" width="640" height="480" data-url="ws://localhost:8000/live/hello"></canvas>
  2. <input type="button" onclick="play()" value="play">
  3. <script src="NodePlayer.js"></script>
  4. <script>
  5. function play() {
  6. var url = document.getElementById("video").dataset.url;
  7. var np = new Module.NodePlayer();
  8. np.setPlayView('video');
  9. np.setScaleMode(1);
  10. np.on('start', () => {
  11. Module.print('NodePlayer on start');
  12. });
  13. np.on('close', () => {
  14. Module.print('NodePlayer on close');
  15. });
  16. np.on('error', (err) => {
  17. Module.print('NodePlayer on error', err);
  18. });
  19. // np.enableVideo(true);
  20. // np.enableAudio(true);
  21. np.start(url);
  22. }
  23. </script>

相关下载

  1. node-media-server: https://github.com/illuspas/Node-Media-Server
  2. ffmpeg: https://github.com/BtbN/FFmpeg-Builds/releases
  3. NodePlayer: https://github.com/illuspas/NodePlayer.js