ESP8266 联网后执行在线代码
espruino/esp8266 加载远程代码
今天玩esp8266的时候突然想到, 是不是可以直接运行线上代码, 这样的话就可以灵活的配置esp8266执行什么操作了, 也不用每次更新代码都要把设备拆下来搞到电脑上去下载程序, 因为本身esp8266就需要联网工作, 所以就想到了联网后获取在线代码进行执行, 如果代码更新只需要重启设备就可以了, 不用每次都插到电脑上去下载代码. 后来翻了一下espruino的文档发现有提供加载线上模块的方法, 于是就实现了一下, 下面是加载远程代码的逻辑.
烧录espruino固件并下载代码
- 配置wifi和线上代码地址 (注意需要使用http协议, 不支持https协议)
- 将代码写入esp8266
- 编写线上代码
- 重启设备
- 重启后设备就会自动联网和拉取指定的代码并执行了.
var wifi = require('Wifi');var app = {config: {wifi: {ssid: '你的wifi名称',password: '你的wifi密码'},// 你的线上代码地址online: 'http://espjs.admin-ui.cn/ota.js'},init: function () {this.wifi();},wifi: function () {var self = this;console.log('wifi connecting...');wifi.connect(self.config.wifi.ssid, { password: self.config.wifi.password }, err => {if (err) {console.log('wifi connect error: ', err);return;}wifi.getIP(function (err, result) {self.onWifiConnected(result);});});},run: function () {this.init();},onWifiConnected: function (result) {console.log('wifi connected: ', result);this.loadModule(this.config.online);},loadModule: function (url, callback) {if (url.substr(0, 4) !== 'http') {url = 'http://www.espruino.com/modules/' + url + '.min.js';}require("http").get(url, function (res) {var contents = "";res.on('data', function (data) { contents += data; });res.on('close', function () {Modules.addCached(url, contents);if (callback) callback();});}).on('error', function (e) {console.log("ERROR", e);});}};app.run();
案例
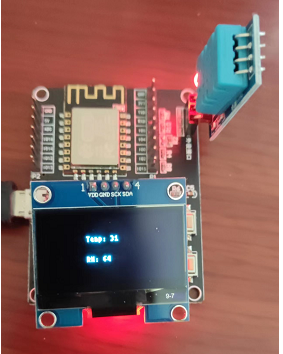
比如我这里用了自己的域名, 线上代码是一个获取温湿度和显示的一个例子.
代码地址: http://espjs.admin-ui.cn/ota.js
var demo = {config: {dht: {pin: NodeMCU.D1},oled: {scl: NodeMCU.D5,sda: NodeMCU.D4,width: 128,height : 64},led: {pin: NodeMCU.D2,}},device: {dht: null,oled: null,led: null},init: function () {this.led();this.oled();this.dht(2000);},led: function () {var self = this;app.loadModule('http://espjs.admin-ui.cn/libs/led.js', function (LED) {self.device.led = new LED(self.config.led.pin);self.device.led.close();});},dht: function (time) {var self = this;app.loadModule('DHT11', function (dht11) {self.device.dht = dht11.connect(self.config.dht.pin);setInterval(function () {self.device.dht.read(function (result) {self.onDht(result.temp, result.rh);});}, time);});},oled: function () {var self = this;var i2c = new I2C();i2c.setup({scl: this.config.oled.scl,sda: this.config.oled.sda,bitrate: 100000});var config = {width: this.config.oled.width,height: this.config.oled.height};app.loadModule('SH1106', function (ssd1306) {self.device.oled = ssd1306.connect(i2c, function () {self.onOledInit();}, config);})},run: function () {this.init();},onDht: function (temp, rh) {console.log('Temp is ' + temp + ' and RH is ' + rh);if (this.device.oled) {this.device.oled.clear(true);this.device.oled.drawString('Temp: ' + temp , 40 , 20);this.device.oled.drawString('RH: ' + rh, 40 , 40);this.device.oled.flip();}},onWifiConnected: function (result) {console.log('wifi connected: ', result);},onOledInit: function () {this.device.oled.clear(true);this.device.oled.drawString("Hello World!", 50 , 40);this.device.oled.flip();console.log('oled init finish');}};demo.run();
效果是这样的:

如果觉得我的文章对您有用,请随意打赏。您的支持将鼓励我继续努力!