百度联盟广告对接

  1. $(function () {
  2. var app = {
  3. config: {
  4. list: [
  5. {
  6. url: /www\.xxx\.com\/$/,
  7. desc: '首页导航下面广告位',
  8. dom: '#nav',
  9. area: 'after',
  10. newDom: '<div class="w1200" style=" text-align: center; margin: 10px auto;"></div>',
  11. script: '//aa.xxx.com/production/f_azcs/source/gp_p/z.js',
  12. }
  13. ]
  14. },
  15. run: function () {
  16. var list = this.config.list
  17. for (var i in list) {
  18. var page = list[i];
  19. if (page.url.test(location.href)) {
  20. if (page.items) {
  21. for (var j in page.items) {
  22. var item = page.items[j];
  23. this.doItem(item);
  24. }
  25. } else {
  26. this.doItem(page);
  27. }
  28. }
  29. }
  30. },
  31. doItem: function (item) {
  32. var next = (item.onBefore ? item.onBefore() : true);
  33. next = next && (item.isShow ? item.isShow() : true);
  34. if (next) {
  35. var newDom = $(item.newDom);
  36. if($(item.dom).length) {
  37. $(item.dom)[item.area](newDom);
  38. newDom[0].appendChild(this.createScript(item.script));
  39. }
  40. }
  41. },
  42. createScript: function (url) {
  43. var script = document.createElement('script');
  44. script.setAttribute('type', 'text/javascript');
  45. script.setAttribute('src', url);
  46. return script;
  47. }
  48. };
  49. app.run();
  50. });

ESP8266 联网后执行在线代码

espruino/esp8266 加载远程代码

今天玩esp8266的时候突然想到, 是不是可以直接运行线上代码, 这样的话就可以灵活的配置esp8266执行什么操作了, 也不用每次更新代码都要把设备拆下来搞到电脑上去下载程序, 因为本身esp8266就需要联网工作, 所以就想到了联网后获取在线代码进行执行, 如果代码更新只需要重启设备就可以了, 不用每次都插到电脑上去下载代码. 后来翻了一下espruino的文档发现有提供加载线上模块的方法, 于是就实现了一下, 下面是加载远程代码的逻辑.

烧录espruino固件并下载代码

  1. 配置wifi和线上代码地址 (注意需要使用http协议, 不支持https协议)
  2. 将代码写入esp8266
  3. 编写线上代码
  4. 重启设备
  5. 重启后设备就会自动联网和拉取指定的代码并执行了.
  1. var wifi = require('Wifi');
  2. var app = {
  3. config: {
  4. wifi: {
  5. ssid: '你的wifi名称',
  6. password: '你的wifi密码'
  7. },
  8. // 你的线上代码地址
  9. online: 'http://espjs.admin-ui.cn/ota.js'
  10. },
  11. init: function () {
  12. this.wifi();
  13. },
  14. wifi: function () {
  15. var self = this;
  16. console.log('wifi connecting...');
  17. wifi.connect(self.config.wifi.ssid, { password: self.config.wifi.password }, err => {
  18. if (err) {
  19. console.log('wifi connect error: ', err);
  20. return;
  21. }
  22. wifi.getIP(function (err, result) {
  23. self.onWifiConnected(result);
  24. });
  25. });
  26. },
  27. run: function () {
  28. this.init();
  29. },
  30. onWifiConnected: function (result) {
  31. console.log('wifi connected: ', result);
  32. this.loadModule(this.config.online);
  33. },
  34. loadModule: function (url, callback) {
  35. if (url.substr(0, 4) !== 'http') {
  36. url = 'http://www.espruino.com/modules/' + url + '.min.js';
  37. }
  38. require("http").get(url, function (res) {
  39. var contents = "";
  40. res.on('data', function (data) { contents += data; });
  41. res.on('close', function () {
  42. Modules.addCached(url, contents);
  43. if (callback) callback();
  44. });
  45. }).on('error', function (e) {
  46. console.log("ERROR", e);
  47. });
  48. }
  49. };
  50. app.run();

案例

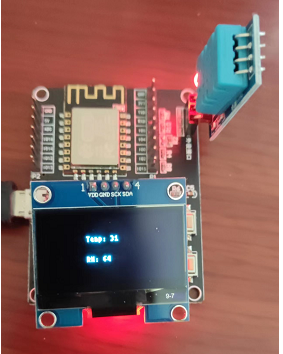
比如我这里用了自己的域名, 线上代码是一个获取温湿度和显示的一个例子.
代码地址: http://espjs.admin-ui.cn/ota.js

  1. var demo = {
  2. config: {
  3. dht: {
  4. pin: NodeMCU.D1
  5. },
  6. oled: {
  7. scl: NodeMCU.D5,
  8. sda: NodeMCU.D4,
  9. width: 128,
  10. height : 64
  11. },
  12. led: {
  13. pin: NodeMCU.D2,
  14. }
  15. },
  16. device: {
  17. dht: null,
  18. oled: null,
  19. led: null
  20. },
  21. init: function () {
  22. this.led();
  23. this.oled();
  24. this.dht(2000);
  25. },
  26. led: function () {
  27. var self = this;
  28. app.loadModule('http://espjs.admin-ui.cn/libs/led.js', function (LED) {
  29. self.device.led = new LED(self.config.led.pin);
  30. self.device.led.close();
  31. });
  32. },
  33. dht: function (time) {
  34. var self = this;
  35. app.loadModule('DHT11', function (dht11) {
  36. self.device.dht = dht11.connect(self.config.dht.pin);
  37. setInterval(function () {
  38. self.device.dht.read(function (result) {
  39. self.onDht(result.temp, result.rh);
  40. });
  41. }, time);
  42. });
  43. },
  44. oled: function () {
  45. var self = this;
  46. var i2c = new I2C();
  47. i2c.setup({
  48. scl: this.config.oled.scl,
  49. sda: this.config.oled.sda,
  50. bitrate: 100000
  51. });
  52. var config = {
  53. width: this.config.oled.width,
  54. height: this.config.oled.height
  55. };
  56. app.loadModule('SH1106', function (ssd1306) {
  57. self.device.oled = ssd1306.connect(i2c, function () {
  58. self.onOledInit();
  59. }, config);
  60. })
  61. },
  62. run: function () {
  63. this.init();
  64. },
  65. onDht: function (temp, rh) {
  66. console.log('Temp is ' + temp + ' and RH is ' + rh);
  67. if (this.device.oled) {
  68. this.device.oled.clear(true);
  69. this.device.oled.drawString('Temp: ' + temp , 40 , 20);
  70. this.device.oled.drawString('RH: ' + rh, 40 , 40);
  71. this.device.oled.flip();
  72. }
  73. },
  74. onWifiConnected: function (result) {
  75. console.log('wifi connected: ', result);
  76. },
  77. onOledInit: function () {
  78. this.device.oled.clear(true);
  79. this.device.oled.drawString("Hello World!", 50 , 40);
  80. this.device.oled.flip();
  81. console.log('oled init finish');
  82. }
  83. };
  84. demo.run();

效果是这样的:

js拦截页面跳转并获取目标地址

  1. navigation.onnavigate = function () {
  2. // 这里可以获取到最终跳转到的url
  3. var url = arguments[0].destination.url;
  4. console.log('url: ', url);
  5. return window.event.returnValue = false;
  6. }

关于Chrome跨域The request client is not a secure context and the resource is in more-private address space loca相关提示的解决

最近想使用serve 配置一个本地的 chrome 脚本注入功能, 没想到浏览器提示:

Access to script at ‘http://localhost:85/index.js‘ from origin ‘http://www.xxx.com‘ has been blocked by CORS policy: The request client is not a secure context and the resource is in more-private address space local.

貌似是chrome有设置, 在地址栏中输入:
chrome://flags/#block-insecure-private-network-requests

然后选Disabled ,relaunch 后就能恢复正常了, 根据翻译:

block-insecure-private-network-requests
防止非安全上下文向更私密的IP地址发出子资源请求。如果1)IP1是本地主机,而IP2不是,或者2)IP1是私有的,而IP2是公共的,则IP地址IP1比IP2更私有。这是全面实施CORS-RFC1918的第一步:https://wicg.github.io/cors-rfc1918–Mac、Windows、Linux、Chrome OS、Android、Fuchsia
阻止不安全的专用网络请求

应该是处于安全考虑, 禁止向私有地址请求和发生数据

直播服务器搭建方法

直播服务器搭建流程

  1. 服务器上安装node-media-server
  2. 本地安装ffmpeg
  3. 测试推流
  4. 浏览器查看直播内容

1. 安装node-media-server

  1. ## 在服务器上启动node-media-server 服务
  2. docker run --name nms -d -p 1935:1935 -p 8000:8000 -p 8443:8443 illuspas/node-media-server

2. 本地安装 ffmpeg

  1. 下载解压对应版本的ffmpeg到本地: https://github.com/BtbN/FFmpeg-Builds/releases
  2. 添加环境变量

3. 测试推流

  1. ## 在本地找到视频文件目录, 执行推流命令
  2. ffmpeg -re -i hello.mp4 -c copy -f flv rtmp://localhost/live/hello

4. 浏览器查看直播

使用NodePlayer.js 播放直播内容: https://github.com/illuspas/NodePlayer.js

  1. <canvas id="video" width="640" height="480" data-url="ws://localhost:8000/live/hello"></canvas>
  2. <input type="button" onclick="play()" value="play">
  3. <script src="NodePlayer.js"></script>
  4. <script>
  5. function play() {
  6. var url = document.getElementById("video").dataset.url;
  7. var np = new Module.NodePlayer();
  8. np.setPlayView('video');
  9. np.setScaleMode(1);
  10. np.on('start', () => {
  11. Module.print('NodePlayer on start');
  12. });
  13. np.on('close', () => {
  14. Module.print('NodePlayer on close');
  15. });
  16. np.on('error', (err) => {
  17. Module.print('NodePlayer on error', err);
  18. });
  19. // np.enableVideo(true);
  20. // np.enableAudio(true);
  21. np.start(url);
  22. }
  23. </script>

相关下载

  1. node-media-server: https://github.com/illuspas/Node-Media-Server
  2. ffmpeg: https://github.com/BtbN/FFmpeg-Builds/releases
  3. NodePlayer: https://github.com/illuspas/NodePlayer.js

Espruino单片机上的javascript

  话说一直想用javascript语法写单片机程序, 因为我本身是web开发出身, 太熟悉js语法了, 以至于看到c 或 python都感觉很别扭, 于是就在网上找到了这个espruino, espruino是一个固件, 可以让esp8266等芯片支持使用js语法编程, 大大减少了web人员学习单片机开发的成本, 甚至可以让本身会js的人直接上手, 了解基础api后, 就可以直接开发自己的单片机项目了, 这里是官网: https://www.espruino.com/ , Espruino文档: http://www.espruino.com/Reference#software

  但是, 官网提供的开发工具用着很不习惯, 而且代码都在一个文件中, 很不方便管理.

  于是我就自己根据espruino的api, 自己写了个命令行工具, 可以使用自己熟练的ide, 然后配合命令行工具进行开发, 执行的时候就像nodejs一样方便, 目前这个命令行工具叫espjs, 文档地址: https://www.kancloud.cn/shuai/espjs

espjs开源地址 github: https://github.com/zhaishuaigan/espjs
espjs国内下载: https://fetch.ngapp.net/soft/espjs/espjs-latest.zip

  这里简单说明一下使用方法:

  1. 将此压缩包里面的文件放到不包含空格和中文的目录中. 如 c:\espruino-tools
  2. 配置系统环境变量path, 添加 c:\espruino-tools
  3. 进入项目目录, 在目录的地址栏输入 cmd, 进入命令行.
  4. 输入espjs flash esp01s 烧写espruino固件
  5. 输入espjs upload 上传当前目录中的代码到设备

然后设备就开始运行代码了, 之后修改代码只需要执行upload 即可更新代码,
实例可参考 demo 目录下的文件
index.js 或 main.js 会被当做入口文件加载执行

注意事项:
1: 端口是自动选择的, 插上设备后会自动选择, 如果有多个设备, 可以使用port命令切换设备
2: 默认的波特率是115200, 如需修改请到config.json中修改
3: 如果要增加开发板支持, 请到config.json 的Flash字段追加
4: 模块不支持远程加载, 例如 require(“MQTT”) 会提示模块不存在, 解决方法是 手动下载mqtt模块(espjs modules add MQTT), 然后使用 require(“modules/MQTT.min.js”) 进行引用.

小程序客服消息处理

三种消息类型:

  1. // 文本消息
  2. {
  3. "signature": "ee6e400de7972484ec6f3014c2f77504925a4707",
  4. "timestamp": "1552298008",
  5. "nonce": "540004383",
  6. "openid": "oPzrj5EAP25lzOVW6qa0m8MUlLXA",
  7. "encrypt_type": "aes",
  8. "msg_signature": "74c419155e49cefab8ab1dbd440b9389acc47e2a",
  9. "URL": "http:\/\/qiang.lt.ngapp.net\/wechat\/noti/fy",
  10. "ToUserName": "zhaishuaigan",
  11. "FromUserName": "oPzrj5EAP25lzOVW6qa0m8MUlLXA",
  12. "CreateTime": 1552293166,
  13. "MsgType": "text",
  14. "Content": "hello",
  15. "MsgId": 1,
  16. "Encrypt": "PloOW0ucj9SkMpMC...."
  17. }
  18. // 事件消息
  19. {
  20. "signature": "3e5860da822266b9f03f8d5380615f9be0ae2db7",
  21. "timestamp": "1552301914",
  22. "nonce": "693467019",
  23. "openid": "oPzrj5EAP25lzOVW6qa0m8MUlLXA",
  24. "encrypt_type": "aes",
  25. "msg_signature": "eda0cdd567b35df4501ee2041e0d191db81798f2",
  26. "ToUserName": "gh_cc23a0a84984",
  27. "FromUserName": "oPzrj5EAP25lzOVW6qa0m8MUlLXA",
  28. "CreateTime": 1552301914,
  29. "MsgType": "event",
  30. "Event": "user_enter_tempsession",
  31. "SessionFrom": "open-type='contact'",
  32. "Encrypt": "oMP\/xo2RdcbK07vvoxxxx....."
  33. }
  34. // 图片消息
  35. {
  36. "signature": "ebd79f0c44f01dc26ef83ffeeadbdb3af5b960da",
  37. "timestamp": "1552302190",
  38. "nonce": "1322948029",
  39. "openid": "oPzrj5EAP25lzOVW6qa0m8MUlLXA",
  40. "encrypt_type": "aes",
  41. "msg_signature": "06613ca44e189d95140166898f80a27ab10baa80",
  42. "ToUserName": "gh_cc23a0a84984",
  43. "FromUserName": "oPzrj5EAP25lzOVW6qa0m8MUlLXA",
  44. "CreateTime": 1552302190,
  45. "MsgType": "image",
  46. "PicUrl": "http:\/\/mmbiz.qpic.cn\/mmbiz_jpg\/WwPGxFUiaTRZ6zVvTTGVbhfa9Vic801ux7OHobAAiaD3xRMYeJzbic4ISvwn736dpK0OMTlaYvX7GoTRgE8LqObkIQ\/0",
  47. "MsgId": 22223624286040849,
  48. "MediaId": "3WiHLigPtkJtqoLvPD2HgPsAtb3vzDvTWyo0sP5s-dshtS7oZOlCW7c3RuD1nwBt",
  49. "Encrypt": "gictSCCy+Zxxxx...."
  50. }

ThinkPHP 5.1保存消息代码

  1. $request = request()->param();
  2. $data = [
  3. 'signature' => $request['signature'],
  4. 'timestamp' => $request['timestamp'],
  5. 'nonce' => $request['nonce'],
  6. 'openid' => $request['openid'],
  7. 'encrypt_type' => $request['encrypt_type'],
  8. 'msg_signature' => $request['msg_signature'],
  9. 'to_username' => $request['ToUserName'],
  10. 'from_username' => $request['FromUserName'],
  11. 'msg_type' => $request['MsgType'],
  12. 'msg_id' => isset($request['MsgId']) ? $request['MsgId'] : '',
  13. 'encrypt' => isset($request['Encrypt']) ? $request['Encrypt'] : '',
  14. ];
  15. $msgInfo = [];
  16. switch ($request['MsgType']) {
  17. case 'text':
  18. $msgInfo['text'] = $request['Content'];
  19. break;
  20. case 'image':
  21. $msgInfo['pic'] = $request['PicUrl'];
  22. $msgInfo['media_id'] = $request['MediaId'];
  23. break;
  24. case 'event':
  25. $msgInfo['event'] = $request['Event'];
  26. $msgInfo['session_from'] = $request['SessionFrom'];
  27. break;
  28. }
  29. $data['msg_info'] = json_encode($msgInfo);
  30. CustomerMessage::create($data);
  31. return '';

数据库表结构设计

  1. <?php
  2. use think\migration\Migrator;
  3. use think\migration\db\Column;
  4. class CreateCustomerMessageTable extends Migrator
  5. {
  6. public function change()
  7. {
  8. $this->table('customer_message')
  9. ->addColumn(Column::string('signature')
  10. ->setDefault('')
  11. ->setComment('签名'))
  12. ->addColumn(Column::integer('timestamp')
  13. ->setDefault(0)
  14. ->setComment('时间戳'))
  15. ->addColumn(Column::string('nonce')
  16. ->setDefault('')
  17. ->setComment('随机数'))
  18. ->addColumn(Column::string('openid')
  19. ->setDefault('')
  20. ->setComment('客户id'))
  21. ->addColumn(Column::string('encrypt_type')
  22. ->setDefault('')
  23. ->setComment('加密方式'))
  24. ->addColumn(Column::string('msg_signature')
  25. ->setDefault('')
  26. ->setComment('消息签名'))
  27. ->addColumn(Column::string('to_username')
  28. ->setDefault('')
  29. ->setComment('消息接收者'))
  30. ->addColumn(Column::string('from_username')
  31. ->setDefault('')
  32. ->setComment('消息来源'))
  33. ->addColumn(Column::string('msg_type')
  34. ->setDefault('')
  35. ->setComment('消息类型'))
  36. ->addColumn(Column::text('msg_info')
  37. ->setNull(true)
  38. ->setComment('消息内容'))
  39. ->addColumn(Column::string('msg_id')
  40. ->setDefault('')
  41. ->setComment('消息id'))
  42. ->addColumn(Column::text('encrypt')
  43. ->setNull(true)
  44. ->setComment('加密数据'))
  45. ->addColumn(Column::dateTime('create_time')
  46. ->setDefault('CURRENT_TIMESTAMP')
  47. ->setComment('创建时间'))
  48. ->addColumn(Column::dateTime('update_time')
  49. ->setDefault('CURRENT_TIMESTAMP')
  50. ->setComment('更新时间'))
  51. ->addColumn(Column::dateTime('delete_time')
  52. ->setNull(true)
  53. ->setComment('删除时间'))
  54. ->create();
  55. }
  56. }

写给刚入行的程序员

源地址: 顶级程序员

1.作为前端开发者,使用双显示器能大幅提高开发效率。

2.学编程最好的语言不是PHP,是English。

3.自己做的东西交付之前先测试一遍。

4.问别人之前最好先自己百度,google一下,以免问出太低级的问题。

5.把觉得不靠谱的需求放到最后做,很可能到时候需求就变了,或者取消了。

6.读好书,垃圾书会浪费你时间。

7.不要炫技,面向人脑编程更便于维护。

8.没事别重复造轮子,你造的轮子大多数时候只有你觉得好用。接手你的轮子的人会在背后骂你上百遍。

9.不要先写框架再写实现。最好反过来,从原型中提炼框架。

10.新技术一定不要找书,书一旦印出来就过时了。

11.请勿久坐,多喝水,尤其是遇到很久都解决不了的问题的时候,多走动走动。

12.考虑可维护性比考虑性能更重要。

13.越难解决的bug往往犯的错误越低级。

14.比起鼓励师,不如给程序员找一个靠谱的产品经理。

15.熬夜低效率写代码,不如好好睡觉。

16.你遇到的问题,大多数人都遇到过,并且网上都有完整的解决方案,你找不到,只是你懒得去找。

17.多沟通,不少加班工作是由于沟通少造成的。

18.普通程序员+google=超级程序员。实在不行,百度也可以,学会利用搜索引擎来辅助自己解决问题。

19.早点找女朋友,生活作息会更健康。你懂的!

20.永远别小看程序媛。即使是青铜,说不定背后有个王者在帮她。

nodejs开发的神器 now

now是什么?

now 允许您轻松、快速和可靠地将JavaScript(Node.js)或Docker支持的网站、应用程序和服务带到云中。实际上,包含package.json或Dockerfile的任何目录都可以通过一个命令:now传输到云。

每次部署一个项目,now 将提供一个新的、唯一的URL(甚至在上传完成之前)。这些URL将看起来像这样(我的应用程序-随机字符串):my-app-erkgfjtrna.now.sh 。

当您部署到生产时,您只需选择适当的别名(自定义域)即可。

官网地址: https:/zeit.co

使用方法

  1. 下载命令行工具: npm install -g now
  2. 创建开发目录 mkdir my-project && cd my-project
  3. 创建package.json
    1. {
    2. "name": "koa",
    3. "version": "1.0.0",
    4. "description": "",
    5. "main": "index.js",
    6. "scripts": {
    7. "start": "node index.js"
    8. },
    9. "author": "",
    10. "license": "ISC",
    11. "dependencies": {
    12. "koa": "^2.6.1"
    13. }
    14. }
  4. 创建index.js
    1. const Koa = require('koa');
    2. const app = new Koa();
    3. app.use(ctx => {
    4. ctx.body = 'Hello Koa';
    5. });
    6. app.listen(80);
  5. 登录 now login 然后输入邮箱地址收取验证邮件, 点击邮件里的验证链接, 这里需要翻墙, 因为验证页面有个js在google上.
  6. 执行 now --public 会输出类似下面的结果.
    1. > Deploying D:\xxxx\my-project under shuai
    2. > Synced 2 files (366B) [1s]
    3. > Using Node.js 8.11.3 (default)
    4. > https://my-project-lcjucjkwmi.now.sh [in clipboard] (sfo1) [3s]
    5. > Building
  7. 执行完成后, 就可以打开上面的地址看到运行结果

别名使用

now --public && now alias shuai
即可生成一个 shuai.now.sh 的地址, 方便记忆

使用自己的域名

now --public && now alias shuai.com
需要根据提示验证域名所有权就能使用自己的域名访问了, 而且自动生成https证书

Vagrant+Virtual Box 快速搭建开发环境

  1. Vagrant.configure("2") do |config|
  2. config.vm.box = "ubuntu/xenial64"
  3. # config.vm.network "forwarded_port", guest: 80, host: 80
  4. # config.vm.network "forwarded_port", guest: 3306, host: 3306
  5. config.vm.network "private_network", ip: "10.0.0.3"
  6. config.vm.provision "shell", inline: <<-SHELL
  7. # 更换aliyun软件源
  8. cp /etc/apt/sources.list /etc/apt/sources.list.bak
  9. echo 'deb http://mirrors.aliyun.com/ubuntu/ xenial main restricted universe multiverse' > /etc/apt/sources.list
  10. echo 'deb http://mirrors.aliyun.com/ubuntu/ xenial-security main restricted universe multiverse' >> /etc/apt/sources.list
  11. echo 'deb http://mirrors.aliyun.com/ubuntu/ xenial-updates main restricted universe multiverse' >> /etc/apt/sources.list
  12. echo 'deb http://mirrors.aliyun.com/ubuntu/ xenial-proposed main restricted universe multiverse' >> /etc/apt/sources.list
  13. echo 'deb http://mirrors.aliyun.com/ubuntu/ xenial-backports main restricted universe multiverse' >> /etc/apt/sources.list
  14. apt-get update
  15. # 安装docker
  16. apt-get -y install apt-transport-https ca-certificates curl software-properties-common
  17. curl -fsSL http://mirrors.aliyun.com/docker-ce/linux/ubuntu/gpg | sudo apt-key add -
  18. add-apt-repository "deb [arch=amd64] http://mirrors.aliyun.com/docker-ce/linux/ubuntu $(lsb_release -cs) stable"
  19. apt-get -y update
  20. apt-get -y install docker-ce docker-compose
  21. # 使用aliyun加速docker镜像
  22. mkdir -p /etc/docker
  23. echo '{' > /etc/docker/daemon.json
  24. echo ' "registry-mirrors": ["https://kag9wqej.mirror.aliyuncs.com"]' >> /etc/docker/daemon.json
  25. echo '}' >> /etc/docker/daemon.json
  26. systemctl daemon-reload
  27. systemctl restart docker
  28. # 把vagrant用户添加到 docker 组
  29. usermod -G docker vagrant
  30. # ssh登录后, 进入/vagrant目录, 并启动docker compose , 然后 输出一下当前正在运行的容器
  31. echo 'cd /vagrant && docker-compose up -d && docker ps' >> /home/vagrant/.bashrc
  32. SHELL
  33. end